 +1 (253) 528-4057
  +966 507438993
Most people don’t understand what are “Expire Headers” and how they help in website speed. Other people are not able to add this feature in WordPress.

Let’s try to make it easy to understand for anyone and everyone.
We need to understand a bit about how browsers help to improve user experience on a website.
All browser applications use a cache to store certain media or resources such as CSS files.
This caching action, decreases page loading time, translating into a delightful user experience.
An important thing to note is that these files are ones that are not changed frequently. A web browser will store these files in the cache. When the page is requested again, the files will be loaded through the browser cache instead of the webserver.
A browser’s cache cannot hold on to a website’s files like images, CSS, Javascript, etc.) forever. These files need to be discarded from the cache after some time. Then fresh data is requested from the webserver.
This is WHERE “Expire Headers” will help you make a faster loading web page.
Got it so far?
Let’s get into a bit more detail and discover HOW the magic happens.
It’s quite simple. All is you need to do, is to set the correct rules in a particular file stored on the webserver. These rules set the date to discard old copies and get fresh copies from the webserver.
HOW WILL BROWSER CACHE EFFECT LOAD SPEED OF A WEBSITE?
When a user clicks on a link in the browser, an HTTP request goes to the web server browser to allow file download. The browser then stores the files in the cache for a specified period.
The browser will serve the files immediately instead of requesting the webserver.
Let us take a look at an example that will help you understand how browser caching can be leveraged for better page speed.
GTMetrix is a specialized website performance analysis tool. The best digital marketing companies use it to track website metrics. A typical report from a website analysis performed on GTMetrix would look like this
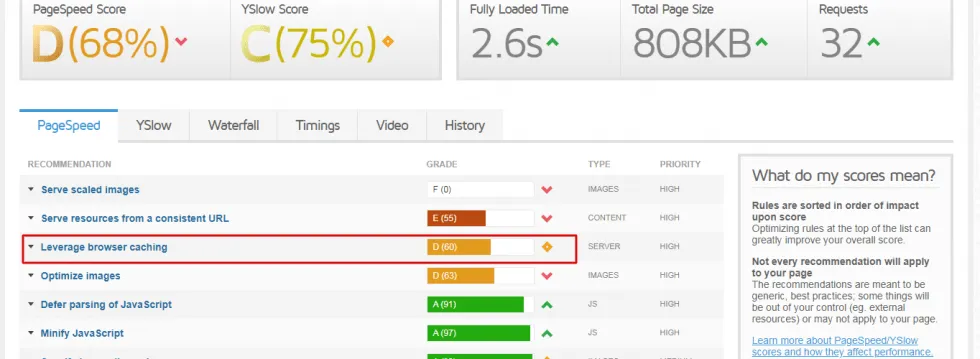
On the screenshot you see, the third recommendation is “Leverage browser caching”. Digital marketing experts know that this requires the addition of “Expire Headers”.
HOW TO ADD EXPIRE HEADERS?
There are two ways in which Expires Headers can be added to leverage a browser’s caching ability.
We can choose to add Expires Headers manually or by using an appropriate plugin. Let’s find out how to do this using both methods.
HOW TO ADD EXPIRE HEADERS?
The solution presented here will show you how to add Expire Headers on Apache and NGINX servers in 4 easy steps.
STEP 1 – Log in to C-Panel on your hosting account.
STEP 2 – Locate the File Manager icon as highlighted below. Click on it.
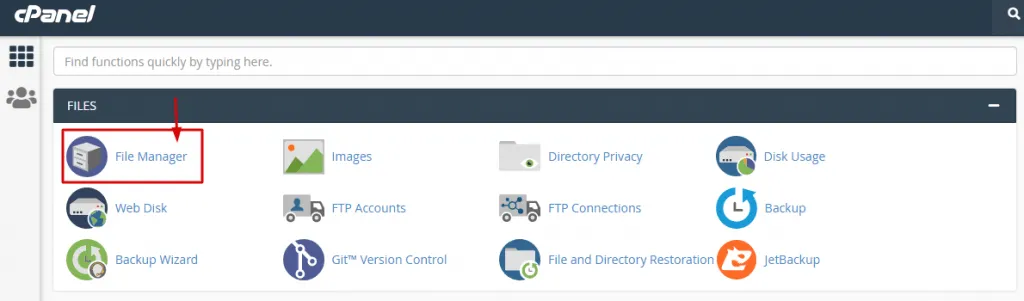
After clicking on the File Manager icon you should be in the files and folder structure of your website.
STEP 3 – Now locate the folder “public_html” (highlighted by the red box & arrow) with a blue globe icon on its side. Go ahead and click on that.
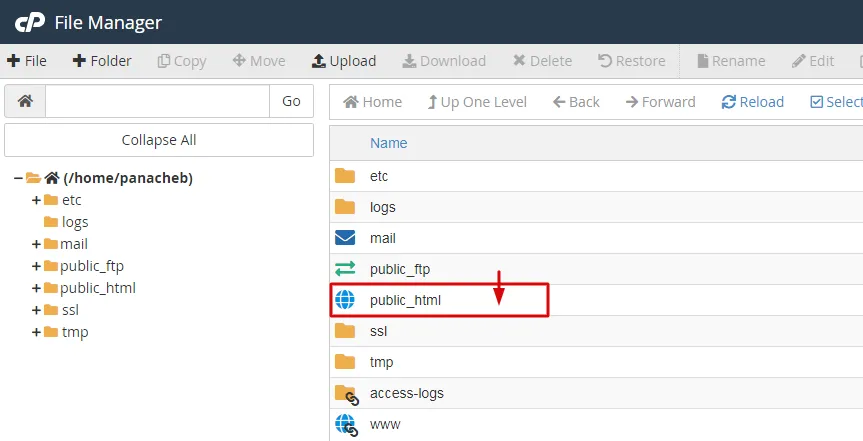
STEP 4 – The public_html folder stores the “.htaccess” file. Navigate your pointer to the “.htaccess” file and RIGHT CLICK on it. When you are presented with a menu, choose EDIT.

Now comes the easiest part.
Just copy and paste the lines of code displayed below.
<IfModule mod_expires.c>
ExpiresActive On
# Images
ExpiresByType image/jpeg “access plus 1 year”
ExpiresByType image/gif “access plus 1 year”
ExpiresByType image/png “access plus 1 year”
ExpiresByType image/webp “access plus 1 year”
ExpiresByType image/svg+xml “access plus 1 year”
ExpiresByType image/x-icon “access plus 1 year”
# Video
ExpiresByType video/mp4 “access plus 1 year”
ExpiresByType video/mpeg “access plus 1 year”
# CSS, JavaScript
ExpiresByType text/css “access plus 1 month”
ExpiresByType text/javascript “access plus 1 month”
ExpiresByType application/javascript “access plus 1 month”
# Others
ExpiresByType application/pdf “access plus 1 month”
ExpiresByType application/x-shockwave-flash “access plus 1 month”
</IfModule>
2. ADDING EXPIRE HEADERS IN WORDPRESS BY USING PLUGIN
If you are not comfortable with editing any files then Adding Expire Headers from .htaccess is not be advisable. Any type of mistake in editing can render the website inaccessible.
Luckily plugins are available for WordPress users to solve this issue. Some of the highly recommended plugins are:
ADD EXPIRE HEADERS PLUGIN
It will:
Reduce page load time by caching browser
Improve user experience
Decrease the total data size of the page
It has both free and pro features.
W3 TOTAL CACHE

When it comes to browser caching W3 TOTAL CACHE plugin is an excellent plugin available. It solves many web page cache problems. It also offers file compression as well as website security, and traffic management. It does a lot more including allowing a user to minify JavaScript, and the best thing of all is that it is a free plugin. Let’s hope it stays that way!
WP ROCKET

WP Rocket is also a great plugin. That is if would like to go with a premium and can afford it.
Starting at 49$ per year it offers a lot. From caching and gzip to compression, lazy loading expires headers and a whole lot more. You don’t need to access any files or add, delete or edit a single line of code. This plugin will do everything for you and keep your website in tip-top shape.
That’s it!
Bookmark this page and come back to it if you need a refresher.